Your scooter’s stability on a hill isn’t magic; it’s a precisely engineered fail-safe system where the brake’s natural state is ‘locked on’.
- Electromagnetic brakes require constant power to *release*, meaning any power interruption—from releasing the throttle to turning the key—instantly engages them.
- This « Default-to-Safe » principle is part of a larger braking ecosystem that includes automatic cornering slowdown and regulatory speed limiters for comprehensive safety.
Recommendation: Treat the daily « Let Go Test »—releasing the throttle on a flat surface to hear the brake click and feel the firm stop—as a non-negotiable pre-ride safety check.
That moment of hesitation at the bottom of a steep driveway or a country lane can be unnerving. As you begin the ascent, a question may flash through your mind: « What if the power cuts out? What stops me from rolling backward? » This anxiety is common, particularly for users who navigate varied terrain. Many know their scooter has « automatic » brakes, but this term can feel vague and insufficient when faced with a real incline. It doesn’t capture the robust engineering designed to protect you.
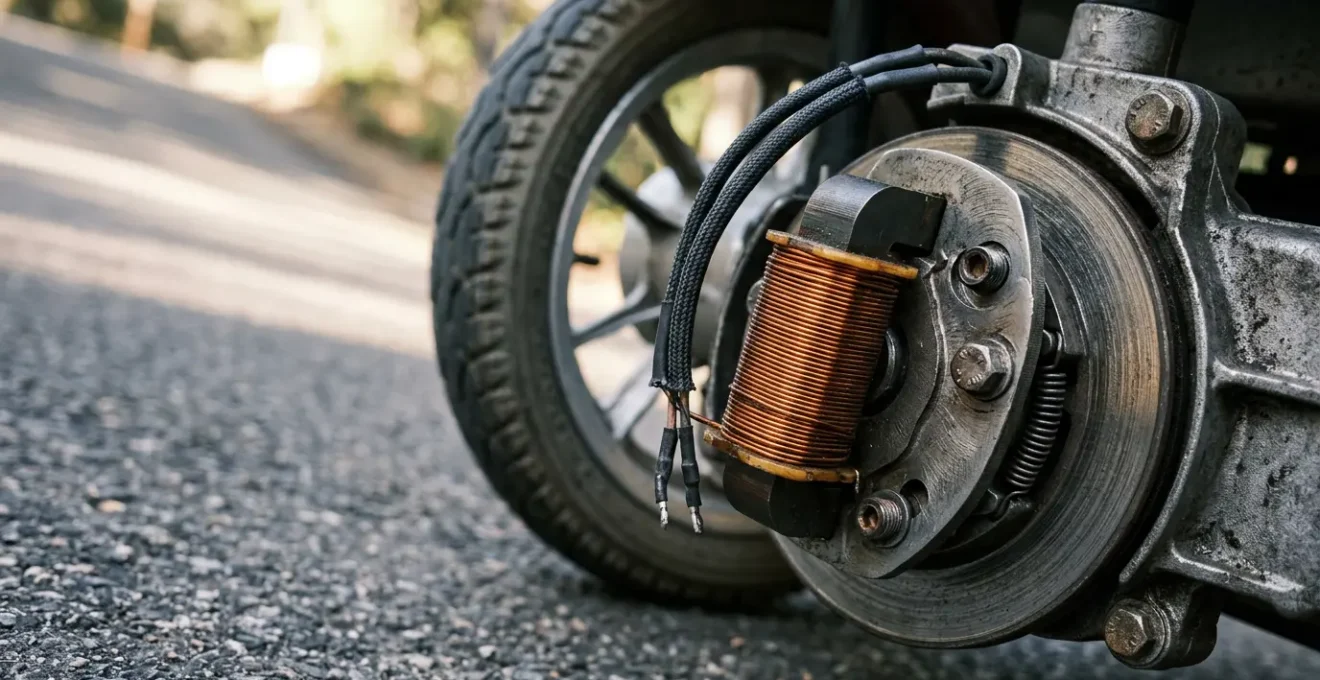
The truth is, your scooter’s ability to hold its ground is not a passive feature but an active, intelligent safety system. Viewing it as a complete « braking ecosystem » is more accurate. This ecosystem is built on a core engineering concept known as the Default-to-Safe Principle. Unlike car brakes that require pressure to engage, your scooter’s primary electromagnetic brake requires electrical power to *disengage*. This fundamental difference is the key to your safety. When power is cut for any reason, the brake’s default, unpowered state is to be fully locked.
This guide moves beyond simple descriptions to offer a safety engineer’s perspective. We will dissect this braking ecosystem, from the mechanics of the electromagnetic brake to the logic of the electronic controller and the regulatory standards that mandate this level of safety. You will learn not just what happens when you release the throttle, but *why* it happens, how to verify your systems are functioning correctly, and how other features like automatic cornering slowdown and mandatory speed limiters work in concert to create a secure riding experience.
To fully grasp how these interconnected systems ensure your safety, this article will explore each critical component. The following sections break down everything from daily checks and diagnostic sounds to the specific regulations governing road use, providing a comprehensive understanding of your scooter’s most vital safety features.
Summary: How Your Scooter’s Electromagnetic Brakes Engineer Your Safety on Steep Hills
- The ‘Let Go’ Test: How to Check Your Auto-Brake Before Every Trip
- The Danger of Neutral: Why Your Brakes Fail When the Lever Is Disengaged?
- Clicking Noises and Delays: When to Service Your Magnetic Brake?
- Does the Key Switch Act as an Emergency Brake in a Panic?
- DVLA Standards: Why Two Braking Systems Are Required for Road Scooters?
- Automatic Slowdown: Why Modern Scooters Brake When You Turn the Tiller?
- Why Motor Torque Matters More Than Speed on Steep Country Lanes?
- Why Speed Restrictors Are Mandatory for Class 3 Scooters on Pavements?
The ‘Let Go’ Test: How to Check Your Auto-Brake Before Every Trip
Before any journey, especially one involving inclines, verifying the health of your electromagnetic brake is the single most important safety action you can take. This isn’t a complex mechanical inspection; it’s a simple, two-minute routine known as the « Let Go Test. » This test confirms that the core Default-to-Safe Principle of your braking system is operational. When you release the throttle, the controller should immediately cut power to both the motor and the brake’s release mechanism, causing the brake to snap shut and hold the scooter firm. This should be an instantaneous and decisive action, not a slow, gentle coast to a stop.
Performing this test with a fully charged battery is critical. The electromagnetic coil requires a consistent voltage to properly disengage the brake. An undercharged battery can lead to misleading results or, worse, intermittent brake failure under load. An issue documented in technical forums highlights this exact scenario: a scooter’s brake worked perfectly on a full charge but began to slip on inclines once the battery level dropped. This proves that a low battery can prevent the magnetic coil from generating enough force, compromising your safety. Therefore, your pre-trip check is only valid if performed at optimal power levels.
Case Study: The Critical Link Between Battery Voltage and Brake Reliability
A real-world case documented on a technical support forum revealed a critical issue: a mobility scooter with electromagnetic brakes operated smoothly when batteries were freshly charged, but after the battery indicator dropped by just one bar, the brake failed to engage properly. This case highlights that electromagnetic brakes require consistent electrical voltage to function correctly. When battery power drops below optimal levels, the magnetic coil may not generate sufficient force to hold the armature plate, causing the brake to slip or fail entirely on inclines. This underscores the importance of maintaining batteries above 70% charge, especially before navigating hilly terrain, and reinforces why the pre-trip brake test should always be performed with a fully charged battery.
Your Pre-Journey Brake Testing Routine
- Find a safe, flat area: Move away from all traffic, pedestrians, and obstacles.
- Engage slow forward motion: Power on the scooter and move forward at a slow walking pace (1-2 mph).
- Release and listen: Let go of the throttle completely. You must hear a distinct, single « click » as the brake engages.
- Feel the stop: The scooter must come to an immediate and firm halt within one or two feet. It should not coast.
- Check for rollback: Once stopped, the scooter must remain perfectly stationary. Any movement, forward or backward, indicates a problem.
The Danger of Neutral: Why Your Brakes Fail When the Lever Is Disengaged?
Every mobility scooter is equipped with a freewheel or « neutral » lever, typically located near the rear wheels. Its function is purely for convenience: to disengage the drivetrain and brake, allowing the scooter to be pushed manually if the battery dies or it needs to be moved in a tight space without power. However, from a safety engineering standpoint, this lever is a mechanical override of the entire automatic braking system. When you pull this lever, you are physically separating the brake mechanism from the motor, rendering the fail-safe system completely inoperable. The scooter will freewheel with no resistance.
The danger arises when this lever is accidentally left in the disengaged position or is not fully re-engaged before riding. If the lever is not securely in the « drive » position, the scooter will have no automatic braking. Releasing the throttle will do nothing, and on an incline, the scooter will immediately and freely roll backward. This is one ofthe most common causes of scooter-related accidents, and it is entirely preventable. Technicians confirm that the freewheel lever is attached to the electromagnetic brake, meaning its position directly dictates whether your primary safety system is active or defeated.
Visually confirming the freewheel lever is in the « drive » position must be part of your pre-trip check, as essential as checking your battery level. The lever should feel firmly locked in place.

As the image metaphorically suggests, leaving this lever disengaged is like propping open a fire door—you have deliberately disabled a critical safety feature. Before you turn the key, make it a habit to physically check that this lever is pushed or locked into its driving position. This simple action ensures your primary braking system is ready to protect you.
Clicking Noises and Delays: When to Service Your Magnetic Brake?
The sounds your scooter makes are a direct line of communication from its mechanical and electrical systems. For the electromagnetic brake, a single, crisp « click » upon throttle release is the sound of safety—it’s the armature plate snapping into place. Any deviation from this sound is a diagnostic signal that requires immediate attention. Ignoring these audible warnings can lead to catastrophic brake failure, especially under the high-stress conditions of a steep hill. Grinding, chattering, or a delayed engagement are not minor quirks; they are clear indicators of wear, electrical faults, or impending failure.
A grinding sound, for instance, suggests that the friction surfaces are worn down, and metal is scraping against metal. A rapid-fire clicking, often called « chattering, » almost always points to an electrical issue, where the controller is sending unstable power to the brake’s solenoid. This can cause the brake to partially engage and disengage in rapid succession, offering little to no actual stopping power. Perhaps the most subtle but equally dangerous sign is a delay. If there’s more than a one-second pause between releasing the throttle and hearing the click, the system is not responding as it should. This could be due to a worn solenoid or a failing controller, both of which compromise the « instant » nature of the fail-safe design.
The following guide translates these sounds into actionable diagnoses. Understanding what you’re hearing allows you to shift from a worried user to an informed operator who knows exactly when to call for service.
| Sound Type | Description | Diagnosis | Action Required |
|---|---|---|---|
| Single Crisp Click | One clear, sharp ‘click’ upon throttle release | Normal operation – brake engaging correctly | None – continue regular use |
| Grinding | Rough, scraping metallic sound during engagement | Worn friction surfaces or armature plate damage | Immediate service – replace brake components |
| Rapid-Fire Clicking (Chattering) | Multiple rapid clicks in succession, like a machine gun | Electrical issue – controller fault or unstable power supply | Immediate service – electrical system diagnosis required |
| Loud Bang | Single explosive or percussive sound | Catastrophic failure – broken internal component | Stop use immediately – emergency brake replacement |
| Delayed Engagement (>1 second) | Click occurs more than 1 second after throttle release | Worn solenoid, failing controller, or low voltage | Schedule service – potential controller or solenoid replacement |
| No Click at All | Complete silence when throttle is released | Total brake failure – electrical disconnection or burnt coil | Do not use – immediate emergency repair required |
Beyond sounds, other physical symptoms warrant an immediate brake replacement. As one expert technician from the Statewide Mobility team advises in their « Common Mobility Scooter & Power Wheelchair Repairs Guide »:
After using your mobility scooter for a short amount of time the batteries dissipate quickly or the brake feels hot to the touch, the brake must be replaced.
– Statewide Mobility Technician, Common Mobility Scooter & Power Wheelchair Repairs Guide
Does the Key Switch Act as an Emergency Brake in a Panic?
In a panic situation, such as a stuck throttle or a feeling of losing control, your instinct might be to turn the key off. This instinct is correct. The key switch is your ultimate emergency brake, and this is a deliberate part of the scooter’s safety design. Unlike gently releasing the throttle, which allows the controller to manage a smooth stop, turning the key causes an immediate and total power cutoff to the entire electrical system. This action forces the Default-to-Safe Principle into its most abrupt form.
When the key is turned, power to the motor and, crucially, to the electromagnetic brake’s release coil is severed instantly. With no electricity holding it open, the brake’s internal spring mechanism slams the armature plate into the locked position. The result is a sudden, powerful halt. Engineering principles confirm that when power is cut off, electromagnetic brakes automatically engage, providing a definitive stop in any situation. This is not a secondary function; it is the primary design characteristic of the system.
However, it’s vital to understand that this is an emergency action, not a standard method of stopping. While it will stop the scooter with absolute certainty, it also cuts power to all other systems, including lights, indicators, and the horn. It is the « Control vs. Stop » trade-off: you gain an immediate, non-negotiable stop at the cost of all other powered functions. This is why it should be reserved for true emergencies where the normal throttle control has failed or is unresponsive. Using the key switch is the most direct way to enforce the will of the braking system over a malfunctioning electronic controller.
DVLA Standards: Why Two Braking Systems Are Required for Road Scooters?
When a mobility scooter is classified as « Class 3, » it means it is legally permitted for road use, with a maximum speed of 8 mph. This higher speed capability brings with it a higher level of regulatory scrutiny from agencies like the DVLA in the UK. A core part of these regulations is the mandate for redundant safety systems. While the primary electromagnetic brake is incredibly reliable, regulations are built on a « what if » foundation. What if the primary system fails? For this reason, Class 3 scooters are required to have a second, independent braking system.
The DVLA’s legal framework is clear: mobility scooters suitable for road use must have a working braking system, with the plural often implied in the detailed requirements for Class 3 models. This secondary system is typically a manually operated cable brake (like a bicycle brake) or a disc brake on one of the wheels. Its purpose is to provide stopping power in the event of a total electrical failure that might somehow compromise the electromagnetic brake or if the scooter is in freewheel mode. This creates redundancy, a key principle of safety engineering. If one system fails, another is there to take its place.
This dual-system approach is a cornerstone of the safety philosophy for any vehicle intended to mix with traffic. As mobility experts at Rent My Roll note, this is an expected feature of higher-performance machines:
Class 3 scooters typically come equipped with advanced braking mechanisms, such as electromagnetic brakes, which provide efficient and quick stops when needed.
– Rent My Roll Mobility Experts, Understanding Class 3 Mobility Scooter Classification and Use
The requirement for an « efficient braking system » is interpreted as a robust, multi-faceted one. The electromagnetic brake provides the automatic, fail-safe stop, while the manual brake provides user-controlled backup. Together, they form a comprehensive safety net that meets the stringent demands of on-road use, ensuring you have control even in the unlikely event of a primary system failure.
Automatic Slowdown: Why Modern Scooters Brake When You Turn the Tiller?
Have you ever noticed your scooter seeming to slow down on its own as you enter a sharp turn? This isn’t your imagination, nor is it the electromagnetic brake engaging. This is a sophisticated, proactive safety feature known as Automatic Cornering Control or a Tiller Angle Sensor. It’s a key part of the modern braking ecosystem, designed to prevent one of the most significant risks for scooter users: tipping during a turn. A scooter’s high center of gravity, combined with the rider’s weight, makes it inherently more susceptible to centrifugal force than a car.
The physics are straightforward: the faster you go and the tighter you turn, the more force is trying to push you sideways and tip you over. The cornering control system mitigates this risk before it becomes critical. It works by using a sensor to monitor the angle of the tiller (the steering column). When you turn the tiller beyond a certain pre-set angle for your current speed, the electronic controller logic intervenes. It doesn’t apply the brake; instead, it reduces the amount of power being sent to the motor. This effectively and smoothly slows the scooter down to a safer speed for the sharpness of the turn you are executing.

This preventive measure is crucial in everyday environments. Imagine navigating the tight aisles of a supermarket, making a sharp turn in a narrow hallway, or maneuvering around pedestrians on a busy pavement. In all these scenarios, the system is working in the background to maintain your stability. On more advanced models, a technician can even adjust the sensitivity of this system, tailoring the level of intervention to the user’s confidence and typical environment. It’s a prime example of the scooter’s controller proactively managing safety, reducing speed *before* the situation becomes unstable.
Why Motor Torque Matters More Than Speed on Steep Country Lanes?
When considering performance on hills, it’s easy to get fixated on top speed. However, for safely and confidently ascending a steep country lane, a different metric is far more important: motor torque. Torque is the rotational force the motor can produce. It’s the « pulling power » that gets you moving from a standstill and keeps you moving up an incline against the force of gravity. Speed is how fast you can go on a flat surface; torque is the muscle that conquers the hill.
As experts at Mobility Scooters Direct state concisely, your priorities must match your environment:
If you live in a hilly area, climbing ability and torque are more important than top speed.
– Mobility Scooters Direct, Best Incline Rating Mobility Scooter Guide
A scooter with a high top speed but low torque will struggle on hills. It may slow to a crawl, strain the motor, and drain the battery rapidly. Conversely, a scooter with high torque, even if its top speed is lower, will handle inclines with a sense of controlled power. This is because the motor is optimized to deliver force efficiently, not just achieve high revolutions per minute. This is why you’ll often see heavy-duty or all-terrain scooters with impressive incline ratings but modest top speeds. Their engineering focus is on power delivery. Rigorous testing confirms this, with documentation showing how a lower-speed motor with high torque demonstrated stable and consistent ascent with impressive hill-handling prowess, prioritizing climbing ability over flat-ground sprints. This dynamic torque is a critical component of your scooter’s safety and performance on challenging terrain.
Key Takeaways
- Your scooter’s primary brake is « fail-safe, » meaning it requires power to release and automatically locks when power is cut.
- Daily checks are vital: test the brake on a flat surface and always ensure the neutral/freewheel lever is in the « drive » position.
- Modern scooters have a « braking ecosystem » that includes automatic slowdown in turns and mandatory speed limiters for comprehensive safety.
Why Speed Restrictors Are Mandatory for Class 3 Scooters on Pavements?
The final piece of the braking and safety ecosystem is the mandatory speed restrictor on Class 3 scooters. While these machines are capable of 8 mph on the road, that speed is dangerously fast for a pedestrian environment. To address this, UK law and regulations like the Highway Code mandate that all Class 3 scooters must be fitted with a speed-limiting device. This device, usually a simple switch on the dashboard often marked with a tortoise and a hare, must reduce the scooter’s maximum speed to 4 mph for use on pavements and in pedestrian areas.
This is not an optional feature; it is a legal requirement for any Class 3 scooter to be road-legal. The directive is unambiguous: drivers must switch to 4 mph in pedestrian areas. This dual-speed capability is the fundamental difference between a Class 2 (pavement only, max 4 mph) and a Class 3 scooter. The limiter allows the scooter to safely coexist in two very different environments. Importantly, engaging the 4 mph speed restrictor does not reduce the motor’s torque. You still have the full pulling power needed for climbing ramps or small inclines, but at a speed that is safe around pedestrians.
This table clearly outlines the regulatory differences and highlights the importance of the speed limiter as a core safety feature for Class 3 models.
| Feature | Class 2 Scooters | Class 3 Scooters |
|---|---|---|
| Maximum Speed (Pavement) | 4 mph | 4 mph (restricted mode required) |
| Maximum Speed (Road) | Not permitted on roads | 8 mph |
| Speed Limiter Device | Not required (single speed) | Mandatory – must reduce to 4 mph on pavements |
| Road Use Permitted | No (pavement/footpath only) | Yes (must be registered with DVLA) |
| Torque Affected by Speed Limit | N/A | No – full climbing power retained in restricted mode |
| Required Safety Features | Basic brakes | Lights, indicators, mirrors, horn, efficient braking system |
| Pedestrian Safety Context | Always at pedestrian-safe speeds | Must switch modes based on location (road vs. pavement) |
Understanding these interconnected systems—from the fail-safe electromagnetic brake to the legal requirement for speed limiters—transforms anxiety into confidence. Your scooter is not just a vehicle; it’s a meticulously designed safety platform. The next logical step is to ensure this platform is always maintained to the highest standard through regular professional servicing.
Frequently Asked Questions on How Electromagnetic Brake Functionality Keeps You Safe on Steep Hills?
What happens when I turn the key switch off while moving?
Turning the key cuts all power to the controller and motor instantly, which forces the electromagnetic brake into its default locked ‘on’ state. This creates an immediate, abrupt stop as it bypasses the controller entirely – unlike releasing the throttle which may provide a softened, controlled deceleration.
When should I use the key switch to stop instead of the throttle?
Use the key switch as an emergency stop in critical situations such as a stuck throttle (accelerator won’t return to neutral), total loss of throttle control, or any electrical malfunction where the scooter continues to move despite releasing the throttle. It is the most definitive way to stop the scooter during an electrical emergency.
What control do I lose when I turn the key switch off?
While the key switch effectively stops the scooter, it also cuts power to lights and potentially powered steering functions. This is the ‘Control vs. Stop’ trade-off – you gain an immediate emergency stop, but you lose illumination and may have reduced steering capability. It’s designed as an emergency stop, not a method for controlled deceleration.