
In summary:
- A true roadside kit is built around solutions for specific failure scenarios, not just a random collection of tools.
- Mastering the location of your scooter’s fuse box before it fails is a non-negotiable diagnostic step.
- Temporary « get-home » fixes for fairings (zip ties) and tires (CO2, sealant) are essential skills to avoid a tow.
- Understanding the correct use of chemicals like lubricants and solvents is critical to avoid causing more damage.
- Regular, user-serviceable maintenance is the best way to prevent most roadside emergencies in the first place.
There’s a universal sinking feeling that every scooter rider knows: the engine sputters, the lights flicker out, and you coast to a silent stop miles from home. In that moment, the difference between a minor inconvenience and a day-ruining call for recovery is what you have stored under your seat. Many guides will simply list a dozen generic tools, leaving you with a pouch full of metal but no real plan. They might mention wrenches or patch kits, but they fail to address the core issue.
The truth is, building an effective roadside kit isn’t about collecting tools; it’s about anticipating failure. A seasoned roadside mechanic doesn’t just carry a wrench; they carry the *right* wrench for the bolt most likely to vibrate loose. They don’t just have a vague idea about electrics; they know how to triage a dead system in minutes. This is the crucial shift in mindset we will explore. Forget building a miniature workshop; we’re going to build a library of pre-planned solutions.
This guide will move beyond the generic lists. We will deconstruct the most common roadside scooter failures and assemble a hyper-focused kit designed to provide a specific, effective solution for each one. From electrical gremlins to loose bodywork and sudden tire deflation, you’ll learn to diagnose the problem and have the exact tool—or trick—to get you back on the road and safely home.
This article breaks down the essential components of a truly practical roadside repair kit, focusing on specific problems and their solutions. The following table of contents will guide you through each critical system, from mechanical fasteners to electrical lifesavers.
Summary: Building the Ultimate On-Board Maintenance Kit for Scooter Breakdowns
- Allen Keys and Spanners: The 5 Tools That Fit 90% of Scooter Bolts
- Where Are They Hidden? Finding the Fuse Box Before You Need It
- The MacGyver Fix: Securing Loose Fairings to Get Home
- CO2 Cartridges: Inflating a Tire Without a Pump
- Grease and Rain: Why Keep a Pair of Nitrile Gloves in the Pouch?
- WD-40 vs Silicone Spray: What to Use on Axles and Tillers?
- Sealant Slime: Can You Prevent Flats Without Changing the Tube?
- What Technical Maintenance Can You Legally Do Yourself on a Mobility Scooter?
Allen Keys and Spanners: The 5 Tools That Fit 90% of Scooter Bolts
From a mechanic’s perspective, the vast majority of non-catastrophic roadside issues boil down to one thing: vibration. Over miles of imperfect roads, bolts and nuts will inevitably work themselves loose. Your first line of defense isn’t a massive socket set, but a small, curated selection of tools that fit the most common fasteners on your specific machine. Your goal is to cover about 90% of the potential « it came loose » failure scenarios with just a handful of items. This is the core of your mechanical toolkit.
Start with a good quality set of folding metric hex keys (Allen keys), as these will fit most fairing bolts, control levers, and accessory mounts. Complement this with a small, adjustable wrench for odd-sized nuts, particularly around the mirrors or battery terminals. Finally, add the specific spanners or sockets needed for your axle nuts. These three tool types—hex keys, an adjustable wrench, and axle nut spanners—form a powerful trio. Keep them bundled with electrical tape and a small magnetic tray to hold any screws you remove, preventing them from disappearing into the roadside abyss.
While building your kit, it’s tempting to add every tool you own, but the roadside mechanic’s philosophy is about efficiency. Focus on the fasteners you can see and access easily. Check your mirrors, levers, brake calipers, and exhaust bracket. Identify the tool sizes you need for those specific points. This targeted approach creates a lightweight, highly effective kit tailored to your scooter, ensuring you have the right solution for the most probable mechanical hiccups.
Where Are They Hidden? Finding the Fuse Box Before You Need It
The most frustrating failure scenario is when your scooter suddenly dies completely—no lights, no horn, no starter. Before you panic and assume the worst, the first step in any electrical triage is to check the fuses. A blown fuse is a simple, cheap fix, but only if you can find the fuse box. The critical part of this task is doing it *before* you’re stranded. A dry, well-lit garage is the place to go on this scavenger hunt, not the shoulder of a rainy road at night.
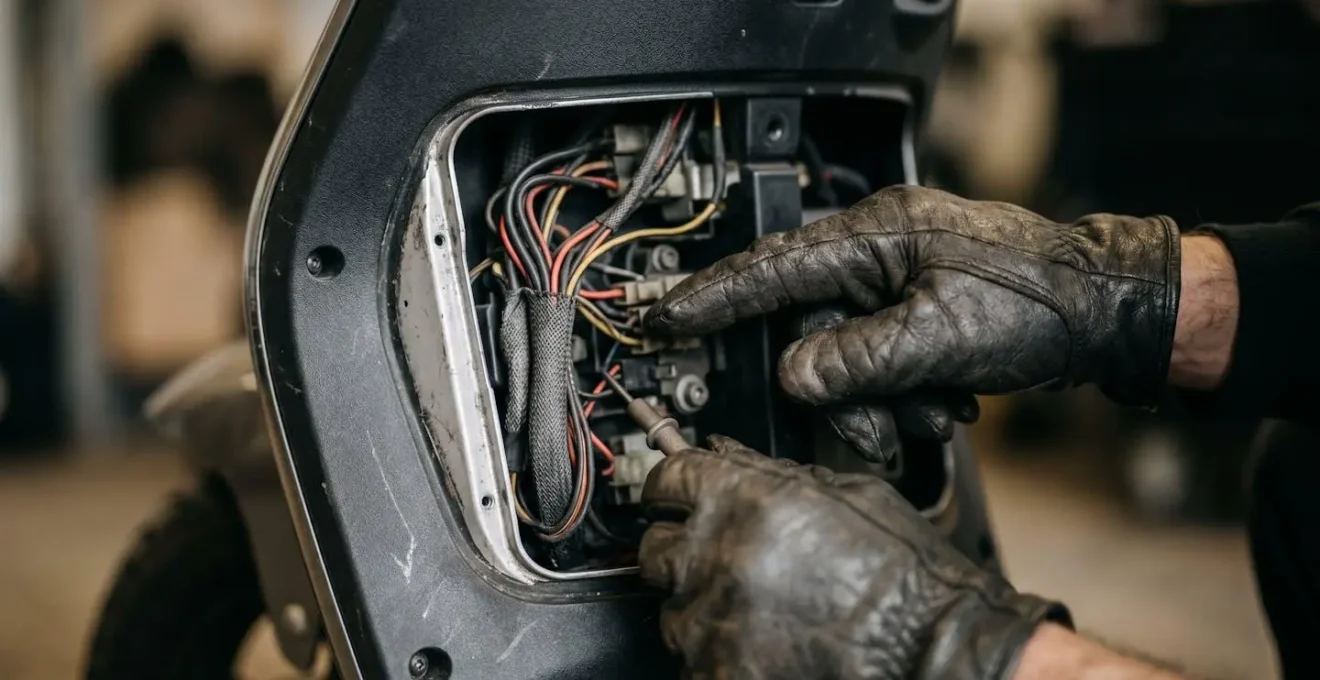
Manufacturers place fuse boxes in a variety of locations, prioritizing either protection or ease of access. The most common hiding spots are under the seat, often near the battery, or behind a removable plastic panel in the front fairing near the headlight assembly. On some models, it might even be tucked away inside the main storage compartment. For electric scooters, the search should focus on the area underneath the deck or near the main battery housing. Carry a spare of each type of fuse your scooter uses; they are small, light, and invaluable when you need one.
Once located, inspect the fuse box cover for a diagram that indicates which fuse protects which circuit. Take a clear photo of this with your phone. This information is priceless for quick diagnostics. If the 15A « Ignition » fuse is blown, you’ve found your problem. Replacing it can get you moving again, but remember: a fuse blows to protect the system from an overcurrent. If the replacement fuse blows immediately, you have a deeper short circuit that will require a proper workshop repair. Still, having performed this check, you’ll be able to give the recovery mechanic a huge head start.
The MacGyver Fix: Securing Loose Fairings to Get Home
A low-speed drop or even a close encounter with a high curb can result in cracked or loose plastic body panels. While it may seem like a cosmetic issue, a flapping fairing at speed is not only distracting but dangerous. It can interfere with controls, get caught in a wheel, or break off entirely, creating a hazard for others. You don’t need a plastic welder in your toolkit, but you do need a reliable « get-home » fix. The undisputed champion of temporary roadside repairs is the humble zip tie.
A handful of assorted-size, heavy-duty zip ties weighs almost nothing and can solve a surprising number of problems. For a loose panel where the bolt has been lost, a zip tie can often be threaded through the bolt hole and around a frame member to secure it. For a cracked panel, the « zip-tie stitch » is a classic roadside technique that provides remarkable strength. This method involves creating small holes on either side of the crack and lacing a zip tie through them, like stitches, to pull the two sides together.
This is a perfect example of a temporary but effective repair that prioritizes safety. The goal isn’t to make it look pretty; the goal is to prevent the component from failing completely before you can get to a workshop for a permanent fix. Having a dozen zip ties and maybe a small multi-tool with an awl (for making holes) turns a potentially ride-ending problem into a ten-minute pit stop.
Emergency Plastic Fairing Repair Using Zip-Tie Stitch Method
A practical roadside repair technique documented in scooter maintenance guides involves using zip ties to temporarily secure cracked plastic body panels. The method requires drilling or punching small holes on either side of a crack and ‘stitching’ it together with small zip ties for a surprisingly strong repair that can last the ride home. The key is to work slowly when manipulating damaged components to avoid creating additional damage.
CO2 Cartridges: Inflating a Tire Without a Pump
A soft or flat tire is one of the most common roadside issues, and a manual pump can be a bulky and slow solution. For a truly compact and rapid inflation system, nothing beats a CO2 inflator. These devices use small, threaded cartridges of compressed carbon dioxide to inflate a tire in seconds. It’s the pocket-sized air compressor that can make the difference between riding home and waiting for a tow truck, especially if you’ve just plugged a small puncture.
The system consists of a small, screw-on valve head (the inflator) and disposable CO2 cartridges. When you need to inflate a tire, you screw a cartridge into the inflator, press it onto the tire’s valve stem, and the compressed gas does all the work. The speed is astonishing; each 16-gram CO2 cartridge discharges 8-9 lbs of inflation in just a few seconds. For a typical scooter tire, two or three 16-gram cartridges are usually enough to get it inflated to a safe, rideable pressure.
There are two key things to remember. First, the cartridge gets extremely cold as it discharges due to the rapid expansion of the gas (a process known as adiabatic cooling), so always wear gloves when using it to avoid a nasty freeze burn. Second, CO2 molecules are smaller than the nitrogen and oxygen in normal air, meaning they will seep out of the tire’s rubber more quickly. A CO2-inflated tire is a temporary fix. It will get you home or to the nearest service station, where you must deflate the tire completely and refill it with standard air.
Grease and Rain: Why Keep a Pair of Nitrile Gloves in the Pouch?
One of the most overlooked yet crucial items in any roadside kit is a simple pair of disposable nitrile gloves. They take up virtually no space and serve a critical two-way protective function. When you’re dealing with a greasy chain, a dirty axle, or any other grimy part of your scooter, they protect your hands, keeping them clean enough to later use your phone or handle your wallet without leaving black smudges everywhere. This might seem like a small convenience, but it’s a significant quality-of-life improvement during a stressful roadside stop.

More importantly, however, the gloves protect the scooter *from you*. The natural oils, dirt, and moisture on your skin can be detrimental to certain components. If you’re handling a new fuse, the oils from your fingers can create a point of resistance that leads to premature failure. If you need to handle your brake disc or brake pads after a repair, touching them with greasy fingers can contaminate the braking surfaces, severely reducing your stopping power. This is a massive safety issue that is easily avoided.
Think of nitrile gloves as your personal clean room. They create a sterile barrier that ensures you’re not introducing contaminants into sensitive systems. Whether you’re trying to keep grease off your hands or hand oils off your brake pads, a pair of sturdy nitrile gloves is the cheapest, lightest, and most effective insurance policy you can carry. Pack a few pairs; they’re worth their weight in gold when you need them.
WD-40 vs Silicone Spray: What to Use on Axles and Tillers?
In the world of DIY mechanics, a common and potentially damaging mistake is the misuse of chemical sprays. The two most frequently confused are WD-40 and silicone lubricant. Thinking they are interchangeable can lead to problems down the road. A true roadside mechanic understands their distinct roles: one is a problem-solver for stuck parts, and the other is a protector for moving parts.
WD-40 is not a lubricant. Its primary functions are as a water displacer (the « WD » stands for Water Displacement) and a penetrating solvent. It’s brilliant for freeing a rusted bolt, cleaning gunk off a part, or driving moisture out of an electrical connection that’s been exposed to rain. If a key won’t turn in a lock or a pivot is seized with corrosion, a shot of WD-40 can break it free. However, because it’s a solvent, it can actually strip away existing grease and oil, leaving the part unprotected. Using it to « lubricate » your axle is a mistake; it will clean off the essential grease, leading to accelerated wear.
Silicone spray is a true lubricant. It leaves a dry, clear film that repels water and provides smooth, low-friction operation. This is the correct choice for lubricating moving parts like control cables, pivot points on levers, and the joints of a mobility scooter’s tiller. Unlike oily lubricants, it doesn’t attract dust and dirt, which is a major advantage for exposed components. The rule is simple: use WD-40 to un-stick, then clean the part and apply a proper lubricant like silicone spray or grease to keep it moving smoothly.
Sealant Slime: Can You Prevent Flats Without Changing the Tube?
Tire sealant, often known by the brand name « Slime, » is a thick, fibrous liquid that you inject into your tire. The idea is that it sloshes around inside, and if a puncture occurs, the escaping air forces the liquid and its fibers into the hole, sealing it automatically. It’s often marketed as a « fix-a-flat » in a bottle and can be a lifesaver, but a responsible mechanic knows its precise limitations.
The primary benefit of sealant is its ability to handle small, straight-on punctures from things like thorns or small nails in the main tread of the tire. For slow leaks or minor punctures, it can be incredibly effective, sealing the hole and allowing you to continue your ride without even realizing you had a problem. However, it is not a magic bullet. Crucial research on tire sealant limitations shows that it cannot be used on sidewall punctures, punctures larger than 6mm, or on tires with significant existing damage. Attempting to seal a large gash or a sidewall cut is futile and unsafe.
Furthermore, testing by organizations like Consumer Reports has shown variable effectiveness, with some products struggling to seal even moderate punctures. It’s also important to follow usage guidelines; after a sealant repair, manufacturers often recommend limiting driving to under 120 miles and at reduced speeds. The verdict from a roadside assistance perspective is clear: tire sealant is an excellent tool to have for a specific type of failure—a small tread puncture. It is not a replacement for a proper tire repair or for carrying a CO2 inflator to re-pressurize the tire after the seal has formed.
Key takeaways
- Adopt a mechanic’s mindset: Your kit should contain solutions for specific, common failures, not just a random assortment of tools.
- Electrical Triage: Knowing the location of your fuse box and having spare fuses is the fastest way to diagnose a dead scooter.
- Get-Home Fixes: Master temporary, safe repairs for bodywork and tires to maximize your chances of riding home instead of waiting for a tow.
What Technical Maintenance Can You Legally Do Yourself on a Mobility Scooter?
The best roadside repair kit is the one you never have to use. The foundation of a reliable scooter is regular, preventative maintenance. While major engine or electrical work should be left to certified professionals, there is a wide range of critical checks and adjustments that you can and should perform yourself. These simple inspections not only extend the life of your scooter but also dramatically reduce the likelihood of a breakdown. The importance of this cannot be overstated, as safety data demonstrates that emergency-department injuries related to e-scooters and e-bikes increased nearly 21% in 2022, highlighting the real-world consequences of poor maintenance.
Legally and practically, an owner is responsible for the general upkeep and safety of their vehicle. This includes a pre-ride inspection every time you head out. You should be checking your tire pressure, testing your brakes, ensuring all lights are functional, and looking for any loose or rattling components. Tightening a loose mirror bolt or topping up your tire pressure in your driveway is infinitely easier and safer than dealing with it on the side of a busy road. This routine becomes second nature and allows you to spot small problems before they escalate.
The following checklist outlines the essential maintenance tasks that every scooter owner should be comfortable performing. Integrating these checks into a weekly or monthly routine will build your mechanical confidence and ensure your scooter remains a reliable and safe mode of transportation.
Your Essential User-Serviceable Maintenance Checklist
- Tire Inspection: Check for visible wear on the tread, look for embedded objects or punctures, and verify proper inflation pressure using a gauge. Replace worn tires promptly.
- Brake System: Visually inspect brake pads or shoes for wear. Test the levers for proper feel and adjust cable tension or fluid levels as needed for optimal stopping power.
- Frame and Fasteners: Do a walk-around and check all major bolts and screws on the frame, suspension, and controls. Tighten anything that has come loose.
- Wiring: Examine visible wiring harnesses for any signs of fraying, cracking, or exposed wires that could lead to a short circuit.
- Bearings and Bushings: Check for smooth movement in the wheels and steering head. Listen for any grinding noises and apply lubrication where needed to reduce friction.
By making these checks a regular habit, you transform from a passive rider into a proactive owner, taking control of your scooter’s safety and reliability. This is the final and most important tool in your maintenance arsenal.