
True on-road safety isn’t achieved by a single bright headlight, but by building a layered visibility system that makes you impossible for other drivers to ignore.
- Effective lighting is about strategic placement and dynamic patterns (biomotion, sequential signals) that trigger driver awareness.
- Passive upgrades like retro-reflective tape on moving parts and dark frame sections are just as crucial as active lights.
Recommendation: Audit your motorcycle’s current light signature from the front, side, and rear, and use the principles in this guide to systematically fill the visibility gaps.
The unsettling feeling is familiar to many riders: navigating through twilight or dense traffic, wondering if that car pulling out of a side street has actually seen you. Standard factory-fitted lights on many motorcycles and scooters are designed to meet minimum legal requirements, not to provide the commanding presence needed for modern road conditions. While the common advice is to simply « get a brighter bulb, » this approach only addresses a fraction of the problem. It focuses on projecting light forward, often ignoring the critical vulnerabilities from the side and rear.
True conspicuity—the science of being seen and recognised—is far more nuanced. It involves creating a distinct and unmistakable « light signature » that captures attention from all angles. This goes beyond raw brightness and delves into the psychology of perception, using motion, contrast, and redundancy to stand out against a visually noisy background. The goal is to move from being merely lit to being unmissable, transforming your machine from a dim, single point of light into a clear, identifiable vehicle.
This guide abandons the simplistic « brighter is better » mindset. Instead, we will explore a systematic approach to building a complete visibility system. We will analyse the science behind different types of light, uncover how to leverage human perception with strategic upgrades, and demonstrate how layering both active and passive lighting creates a shield of safety around you and your bike. This is about taking active control of your presence on the road.
To help you navigate these critical upgrades, this article breaks down the most effective strategies for enhancing your motorcycle’s visibility. The following summary outlines the key areas we will cover, from understanding the science of light to implementing practical, life-saving modifications.
Summary: Beyond Stock Lights: Upgrading Lights and Reflectors for Maximum Safety
- Candlepower vs Lumens: How Bright Must Your Headlight Be for Road Use?
- Why Upgrading to LED Lights Is Essential for Winter Safety in Britain?
- Cable-Free Upgrades: Adding 500 Lumens Without Wiring
- Black Reflective Tape: Stealth by Day, Glowing by Night
- Side Visibility: Where to Stick Tape to Avoid Junction Collisions?
- Side Repeaters: Helping Cars See You Are Turning at Roundabouts
- Puddle Lights: Seeing the Ground When Getting Off in the Dark
- Rear Redundancy: Lights on the Bag vs Lights on the Scooter
Candlepower vs Lumens: How Bright Must Your Headlight Be for Road Use?
The first step in upgrading your lighting is to move beyond the marketing hype of « lumens. » While lumens measure the total amount of light a bulb produces in all directions, it’s a poor indicator of real-world effectiveness. The critical metric for a headlight is candela (or candlepower), which measures the intensity of the light focused in a specific direction. A high-lumen bulb with a poorly designed reflector will scatter light everywhere, creating glare for oncoming drivers while failing to illuminate the road ahead. Conversely, a well-engineered headlight with a lower lumen rating can produce a high candela value, projecting a powerful, focused beam exactly where you need it. This distinction is vital, as NHTSA data indicates that in over 40% of fatal crashes involving a motorcycle and another vehicle, the other driver violated the motorcyclist’s right-of-way, often with the excuse of « I didn’t see him. »
A truly effective headlight balances high candela for long-distance projection with a carefully shaped beam pattern. This pattern should have a sharp horizontal « cutoff » to prevent dazzling oncoming traffic, while also providing enough peripheral light (spill) to illuminate the sides of the road. For road use, legality is paramount. Any upgrade must be DOT (in the US) or ECE (in Europe) compliant, which ensures the beam pattern, color temperature, and intensity meet strict safety standards. Simply chasing the highest lumen number often leads to illegal and dangerous levels of glare. The goal is not to be the brightest object on the road, but the most clearly identifiable vehicle.
This table breaks down the essential differences between these two crucial metrics:
| Metric | Lumens (Total Light Output) | Candela (Focused Intensity) |
|---|---|---|
| Definition | Total quantity of visible light emitted in all directions | Luminous intensity in a specific direction |
| Relevance for Daytime Visibility | Moderate – diffused light less visible in bright conditions | High – focused beam cuts through ambient light |
| Typical Motorcycle Range | 1,800-3,500 lumens (LED headlight) | 15,000-50,000+ candela (center beam) |
| Glare Risk | Low with proper beam pattern | High if poorly aimed or excessive |
| Best Use Case | Close-range illumination, side visibility | Distance projection, daytime conspicuity |
Why Upgrading to LED Lights Is Essential for Winter Safety in Britain?
In the low-light, often damp conditions of a British winter, reaction time is everything. This is where upgrading from traditional incandescent bulbs to modern LED (Light Emitting Diode) technology provides a decisive safety advantage. The benefit isn’t just about brightness; it’s about speed. Incandescent bulbs have a « rise time »—a delay of up to a quarter of a second to reach full brightness as the filament heats up. LEDs, by contrast, are solid-state devices that achieve full intensity almost instantaneously. This seemingly small difference has a profound impact on the driver behind you.
A landmark study by the University of Michigan Transportation Research Institute found that LED brake lights give the following driver an extra 166 milliseconds of reaction time on average. At highway speeds, this fraction of a second translates into a significant reduction in stopping distance—precious feet that can be the difference between a close call and a rear-end collision on a slippery road. The crisp, clean light produced by LEDs is also more conspicuous and less prone to being lost in the visual noise of rain-slicked streets and other vehicle lights.
Case Study: The Real-World Impact of LED Brake Light Speed
Research comparing driver responses to various brake light technologies confirmed the significant safety margin provided by LEDs. The study observed that drivers of all experience levels reacted more quickly when the lead vehicle was equipped with LED brake lights compared to incandescent ones. In practical terms, this 166ms advantage provides a following driver at 60 mph with an extra 14.6 feet of braking distance. In the compromised grip conditions of winter, this added margin is a critical, potentially life-saving, layer of safety that technology provides.
As automotive lighting specialist Michael Sivak noted in his research on the topic, this delay is an inherent flaw in older technology.
Standard incandescent brake lamps have a relatively slow rise time. It takes approximately a quarter of a second for them to reach 90% of asymptotic light output, causing potential delays in responses by following drivers.
– Michael Sivak, UMTRI Technical Report on Brake Lamp Reaction Times
Furthermore, LEDs have a much longer lifespan and are more resistant to vibration than fragile incandescent filaments, making them a more reliable choice for the harsh environment of a motorcycle. For riders facing the challenging visibility of winter, an LED upgrade is not a luxury; it is an essential piece of safety equipment.
Cable-Free Upgrades: Adding 500 Lumens Without Wiring
Enhancing your visibility doesn’t always require tapping into your bike’s complex wiring loom. Some of the most effective upgrades are self-contained, battery-powered units that focus on making the rider, not just the bike, more visible. By placing small, bright LED lights on your helmet and shoulders, you can leverage a powerful perceptual phenomenon known as biomotion. The human brain is hardwired to recognize the unique pattern of a walking or running human. By attaching lights to your limbs and head, you tap into this innate recognition system, transforming you from an ambiguous point of light into an unmistakably human figure in motion.
Research from a Cochrane Systematic Review confirms this, stating that « retroreflective materials enhance recognition, in particular when arranged in a ‘biomotion’ configuration, taking advantage of the motion from a pedestrian’s limbs. » The same principle applies with even greater effect when using active, battery-powered lights. Adding a 200-lumen light to your helmet and 150-lumen lights to each shoulder easily adds 500 lumens to your overall light signature. This creates a larger, taller, and more dynamic visual profile that is exceptionally difficult for other drivers to misinterpret or ignore, especially at night.
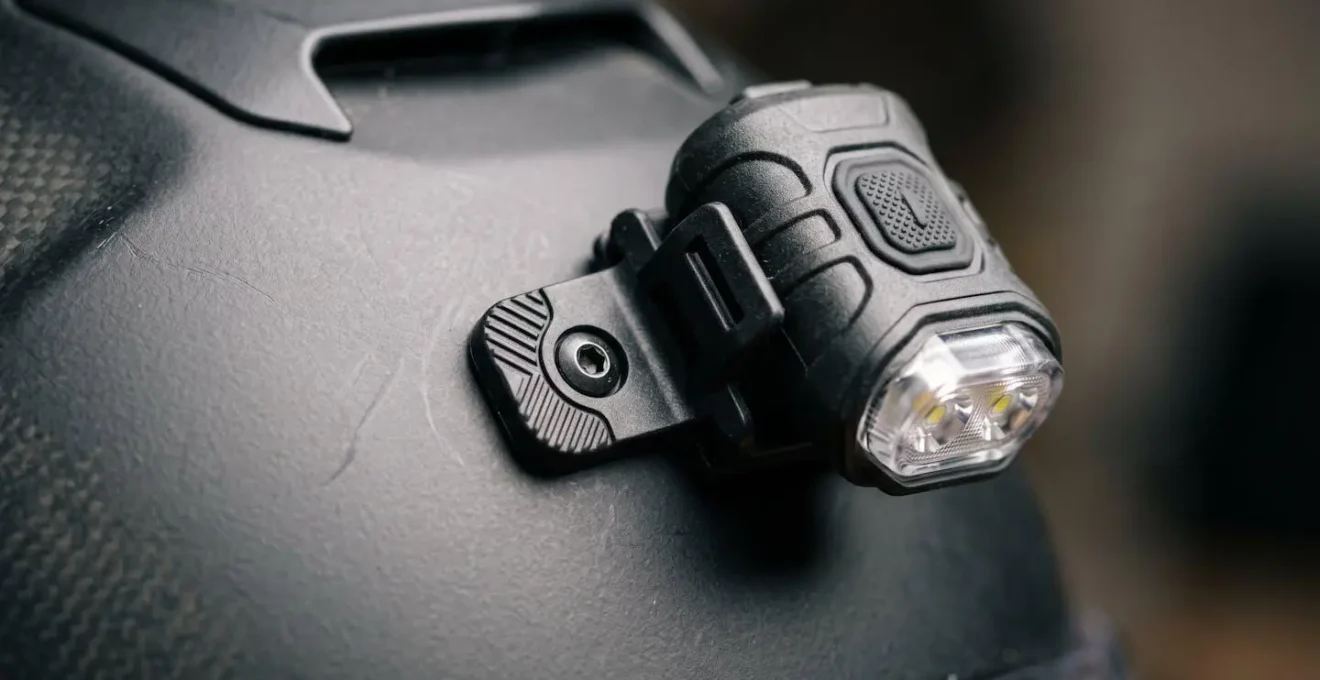
As shown in the image, placing these lights at key pivot points—the top of the helmet, the back of the helmet, and the outer edges of the shoulders—creates a « triangle of conspicuity. » This dramatically increases your perceived size and makes your movements, like head checks before a lane change, far more obvious to surrounding traffic. Modern units are lightweight, USB-rechargeable, and offer various flashing patterns to further enhance their attention-grabbing power.
Black Reflective Tape: Stealth by Day, Glowing by Night
One of the most elegant and effective visibility solutions is also one of the most subtle. For riders who dislike the look of bright, colourful decals on their bike, black retro-reflective tape offers the perfect compromise between aesthetics and safety. During the day, this material appears as a matte or semi-gloss black, blending seamlessly with the frame, swingarm, or black plastic components of the motorcycle. It’s virtually invisible, preserving the bike’s clean, stock appearance.
At night, however, its properties are transformed. When struck by a vehicle’s headlights, the tape’s microscopic glass beads reflect light directly back to its source, causing it to glow an intensely brilliant white or gold. This creates a sudden, unmissable « bloom » of light, outlining the shape and size of your motorcycle to other drivers. This is especially crucial given that NHTSA data shows that a staggering 76% of pedestrian fatalities occur after dark, highlighting the extreme danger of poor nighttime visibility. The same risk applies directly to motorcyclists.
The strategic application of this tape can significantly enhance your side and rear profile. Placing strips on the rear of the saddlebags, the license plate bracket, or along the vertical lines of the rear subframe helps define your bike’s dimensions to following traffic. For side visibility, applying it to the lower fork legs, swingarm, and the outer rims of your wheels adds both static reflection and the powerful effect of biomotion as the wheels spin. It’s a low-cost, high-impact upgrade that works passively to protect you whenever you’re on the road after sunset.
Side Visibility: Where to Stick Tape to Avoid Junction Collisions?
A motorcycle’s greatest vulnerability is its narrow side profile, making it perilously easy to be overlooked at junctions and T-intersections. This is a life-threatening issue, with some regional data showing that as many as one in three motorcycle fatalities occur at intersections. While a bright headlight provides forward conspicuity, it does little to prevent the classic « SMIDSY » (Sorry Mate, I Didn’t See You) accident where a car pulls out into your path. The key to mitigating this risk is to make your side profile as large and as dynamic as possible using strategic application of retro-reflective tape.
To maximize effectiveness, focus on two principles: motion and contour. Apply reflective tape to parts of the motorcycle that move. The rims of your wheels are the most effective location. As they rotate, the tape creates a brilliant, scintillating circle of light that is psychologically impossible for another driver’s brain to ignore. This transforms your bike from a static, thin object into a dynamic, attention-grabbing spectacle. Applying tape to the lower fork legs also adds a vertical, bobbing motion that enhances recognition.
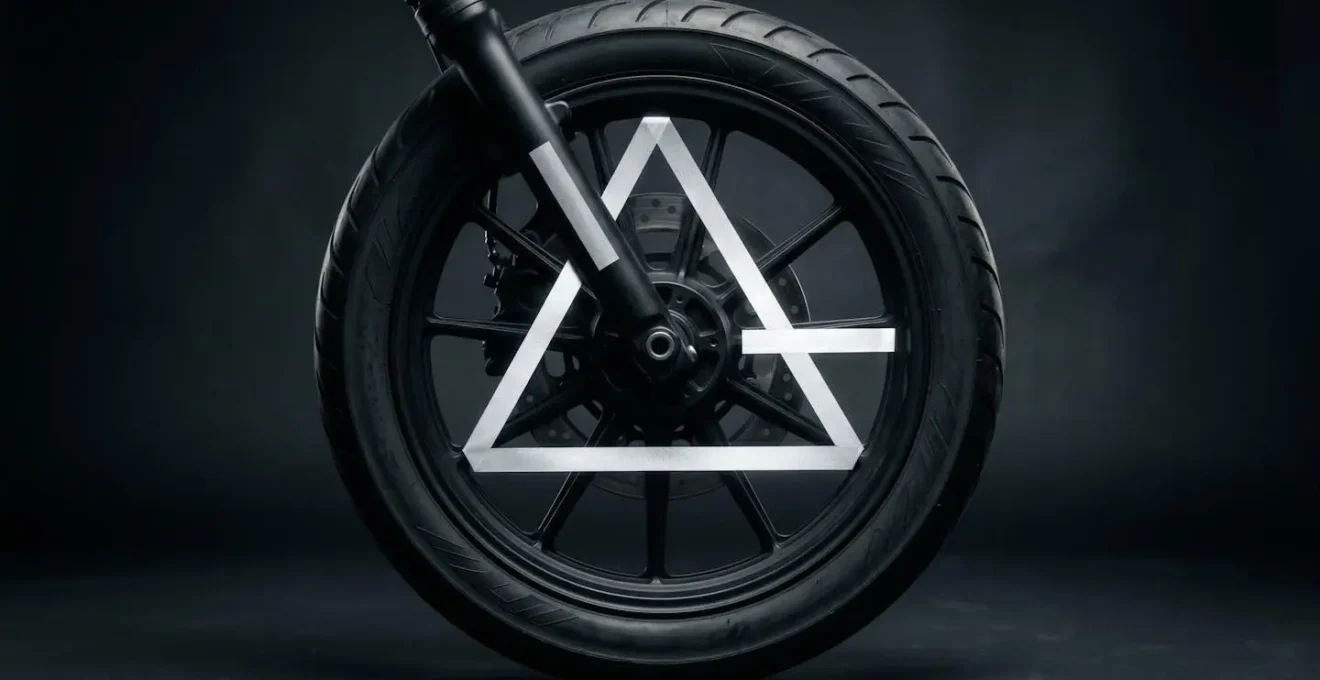
Beyond motion, use tape to outline the bike’s contour. Place strips along the hard edges of panniers, the lower edge of the frame, and on the side of the front fender. When choosing a color, daytime visibility is also a factor. Research has found that fluorescent materials in yellow and orange are most effective for daytime detection. For nighttime, high-quality retro-reflective tape in silver, red, or yellow provides the best performance. By combining motion-based reflection on the wheels with contour-defining strips on the chassis, you create a side profile that is significantly larger, more dynamic, and harder to overlook.
Side Repeaters: Helping Cars See You Are Turning at Roundabouts
Standard motorcycle turn signals, often small and located only at the front and rear, are notoriously inadequate in complex traffic situations like multi-lane roundabouts or busy intersections. A driver positioned to your side may not see your flashing indicator, leading them to assume you are continuing straight when you intend to turn. This is a common factor in intersection accidents, with NHTSA data revealing that left-turn related incidents account for 43% of all fatal two-vehicle motorcycle crashes. Installing side repeaters—additional turn signals on the side of the bike—is a critical upgrade to combat this.
These can be integrated into handguards, mirror stalks, or fairing panels. Their purpose is to provide a clear, unambiguous signal of your turning intention to drivers in adjacent lanes. To maximize their effectiveness, opt for sequential LED indicators. Unlike a simple flashing light, a sequential signal illuminates a strip of LEDs in a sweeping motion, creating a « motion vector » that clearly indicates the direction of your intended travel. The automotive industry has widely adopted this technology, proving its effectiveness in capturing driver attention.
This dynamic light pattern is a form of perceptual hack; the human brain is more attuned to movement than to a static blinking light, making a sequential indicator significantly harder to ignore. When approaching a roundabout, activating a bright, sweeping amber light on the side of your bike provides an unmissable cue to the driver waiting to enter, drastically reducing the chance they will pull out in front of you. It’s a simple addition that directly addresses one of the most common and dangerous scenarios a rider faces.
Puddle Lights: Seeing the Ground When Getting Off in the Dark
Visibility isn’t just about being seen by others; it’s also about your own ability to see your immediate surroundings, especially when your ride ends. Stopping in an unfamiliar, poorly lit area can be hazardous. The ground could be uneven, slick with oil, or covered in loose gravel, creating a risk of a slip or a dropped bike the moment you put your foot down. Puddle lights, a feature common on high-end cars, can be easily and inexpensively adapted for motorcycles to solve this problem.
These are small, low-mounted LED lights designed to illuminate the ground on either side of the bike. The most effective systems are wired to a tilt or mercury switch on the sidestand, so they activate automatically only when you park. This provides a pool of light exactly where you need it to plant your feet securely, inspect your parking spot, and avoid potential hazards. It adds a layer of safety and convenience at the end of every journey in the dark.
While you can buy pre-made kits, a DIY approach allows for greater customization to fit your specific bike and needs. The key is to select a wide-angle flood beam to cover a large area and to position the lights to avoid glare while maximizing ground illumination. This small touch not only prevents a costly tip-over but also adds a professional, premium feel to your machine.
Action Plan: DIY Smart Puddle Light Installation
- Select Light Modules: Choose compact, waterproof LED pods with a wide flood beam pattern (at least 120-degree spread) to ensure broad ground coverage.
- Install an Activation Switch: Mount a simple tilt switch or mercury switch to the sidestand pivot. This will act as the trigger, activating the lights only when the sidestand is deployed.
- Wire the Circuit Safely: Connect the lights to your bike’s accessory power source through a low-draw relay. This prevents the lights from draining the battery when the ignition is off. The tilt switch will control the relay.
- Position for Coverage: Mount the LED pods on the lower frame rails or a bracket near the sidestand. Angle them downward at approximately 45 degrees to cast a wide pool of light without creating upward glare.
- Test and Calibrate: With the bike on a stand, test the system by deploying the sidestand. Adjust the sensitivity or angle of the tilt switch to ensure it doesn’t activate falsely during normal riding lean angles.
Key Takeaways
- Effective visibility requires a « system » approach, layering active lights (LEDs) with passive reflectors.
- Focus on candela (focused intensity) for headlights, not just lumens, and ensure any upgrade has a legal, glare-free beam pattern.
- Use motion to your advantage by placing lights and tape on the rider (biomotion) and on moving parts like wheels to hack driver perception.
Rear Redundancy: Lights on the Bag vs Lights on the Scooter
The final principle in building a robust visibility system is redundancy. Relying on a single, low-mounted factory taillight is a significant point of failure. It can be obscured by a passenger, luggage, or road spray, or it may simply be too low to fall within the direct line of sight of a distracted driver in a tall SUV. Given that motorcycles account for only 3% of registered vehicles but a shocking 14% of traffic fatalities according to NHTSA, every possible safety layer is justified. Creating redundancy by adding a second, high-level brake and tail light is one of the most powerful actions you can take.
The most effective location for this secondary light is high up on the rider’s back, either integrated into a backpack or mounted on a top case. This position offers two key advantages. First, it places the light directly at eye-level for the majority of car and truck drivers, making it impossible to miss. Second, it decouples a critical safety light from the motorcycle itself. If the bike’s electrical system fails or the stock light is damaged, your redundant light continues to function, providing a vital layer of protection.
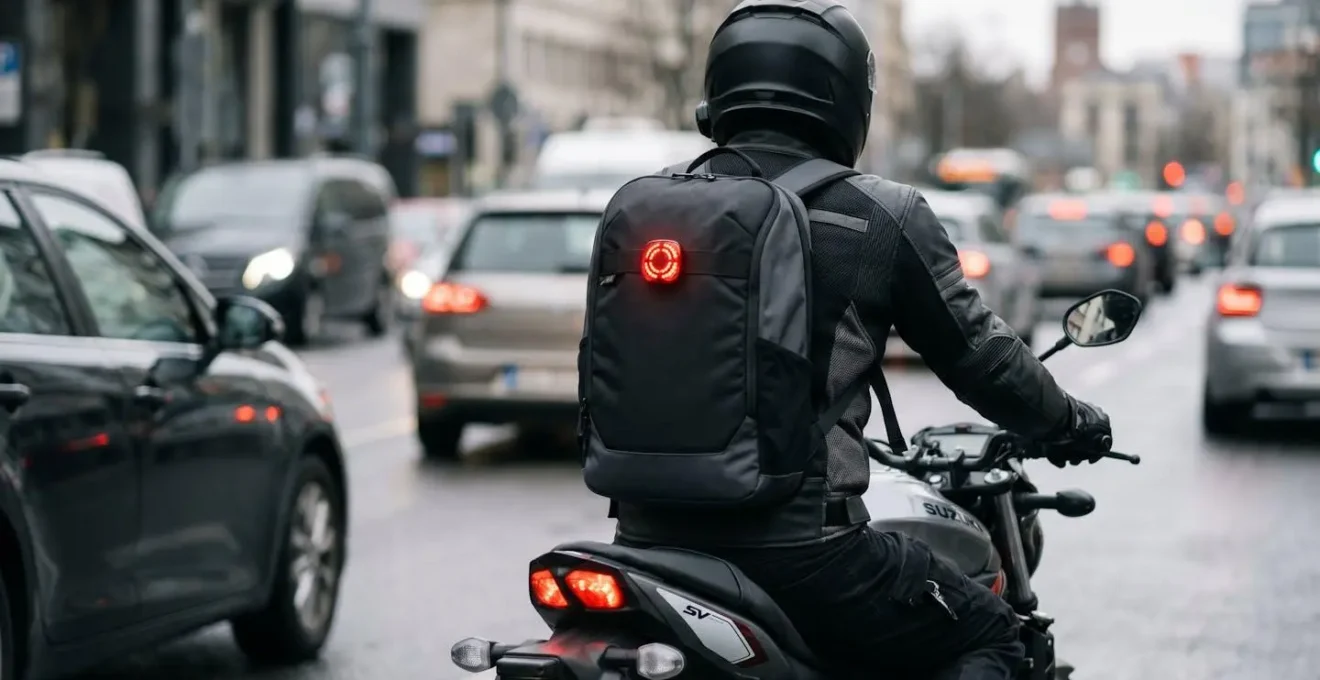
Many modern solutions are completely wireless, using an accelerometer to detect deceleration and automatically activate the brake light, while syncing with the bike’s system for turn signals. Whether you choose a hard-wired light on a top case or a battery-powered unit on a backpack, you are elevating your most important signal— »I am stopping »—to a position where it is undeniable. This creates a larger, taller, and more resilient rear light signature that dramatically reduces the risk of a rear-end collision.
Ultimately, taking control of your visibility is one of the most empowering acts of self-preservation a rider can undertake. Start by performing a simple audit of your bike tonight: have a friend view it from 50 yards away from the front, side, and rear. The gaps in your light signature will become immediately obvious. By systematically addressing them with these layered, perception-driven upgrades, you transform yourself from a passive victim of circumstance into an active, unmissable presence on the road.