In summary:
- Focus on preventative tasks like lubrication and bolt tightening to avoid major failures.
- Learn to diagnose simple electrical issues like fuses and battery terminals to restore power safely.
- Understand the « red lines »—when to stop and call a professional to prevent costly damage.
That moment of hesitation is familiar to many mobility scooter owners. A new squeak, a slight wobble, or a scooter that just won’t start. The immediate dilemma: make a potentially expensive call to a technician for what might be a simple fix, or risk venturing into a DIY repair that could void your warranty or, worse, make the problem more severe. This fear often leads to inaction, allowing small, fixable issues to snowball into major breakdowns.
Most advice you’ll find online circles around the obvious: check tire pressure, keep the scooter clean, and read the owner’s manual. While this is sound, it fails to address the crucial « gray area » of maintenance—the simple mechanical and electrical tasks that fall between basic cleaning and a full motor rebuild. These are the jobs that, with the right knowledge, you are perfectly capable of handling yourself, saving time, money, and frustration.
The key isn’t a long, intimidating checklist. It’s adopting a technician’s mindset: understanding the core principles behind common failures. It’s about knowing why bolts loosen, why batteries corrode, and where the clear « red line » is between a safe DIY task and a job for a certified professional. This guide is built to empower you with that exact knowledge, demystifying the mechanics of your machine.
We will walk through the specific, technician-approved tasks you can legally and safely perform. From proper lubrication and electrical diagnosis to building a minimalist but highly effective toolkit, you’ll gain the confidence to become the first line of defense in your scooter’s reliability and longevity.
This article breaks down the essential DIY maintenance tasks into clear, manageable sections. The following summary outlines the key areas we will cover, giving you a roadmap to becoming a more confident and capable mobility scooter owner.
Summary: The Ultimate Guide to DIY Scooter Maintenance
- WD-40 vs Silicone Spray: What to Use on Axles and Tillers?
- The Vibration Effect: Checking Wheel Nuts and Tiller Bolts Monthly
- Corrosion Prevention: Cleaning Battery Terminals with Vaseline?
- Blown Fuse Diagnosis: How to Find and Fix the Silent Killer?
- Carbon Brushes: The Consumable Part No One Tells You About
- The ‘Every Ride’ Rule: Why You Should Charge Even After a Short Trip?
- Allen Keys and Spanners: The 5 Tools That Fit 90% of Scooter Bolts
- Building the Ultimate On-Board Maintenance Kit for Scooter Breakdowns
WD-40 vs Silicone Spray: What to Use on Axles and Tillers?
One of the most common mistakes in DIY maintenance is grabbing a can of WD-40 for every squeak and stiff joint. As a technician, I must be clear: WD-40 is not a long-term lubricant. It is primarily a water displacer and solvent. While it might quiet a squeak temporarily, it can strip away existing grease and attract dust and grime, ultimately making the problem worse. For moving parts on your scooter, you need a true lubricant.
The correct choice for most applications, like the tiller folding mechanism or seat post, is a silicone-based spray. Silicone creates a slick, durable film that repels water and doesn’t attract dirt. It’s safe for plastics, metal, and rubber, making it a versatile and essential part of your kit. For metal-on-metal components that require a more robust, long-lasting coating to prevent rust, a specialized protective spray is even better.
Applying lubricant correctly is just as important as choosing the right one. Overspray can be messy and even dangerous if it gets on your tires or brake components. The professional technique is to spray the lubricant onto a clean rag first, then wipe it onto the part. This gives you complete control, prevents messes, and ensures an even coating exactly where it’s needed.
Your Action Plan: Safe Lubrication Application Technique
- Apply protective coating like Boeshield T-9 to metal surfaces and fasteners to repel moisture and slow oxidation.
- Always avoid overspray on brake components and electrical contacts to prevent damage.
- Clean old parts with a degreaser and rag before applying new lubricant to prevent grinding paste formation.
- For silicone spray, apply onto a rag first, then wipe it onto the part to prevent messy overspray on floors or tires.
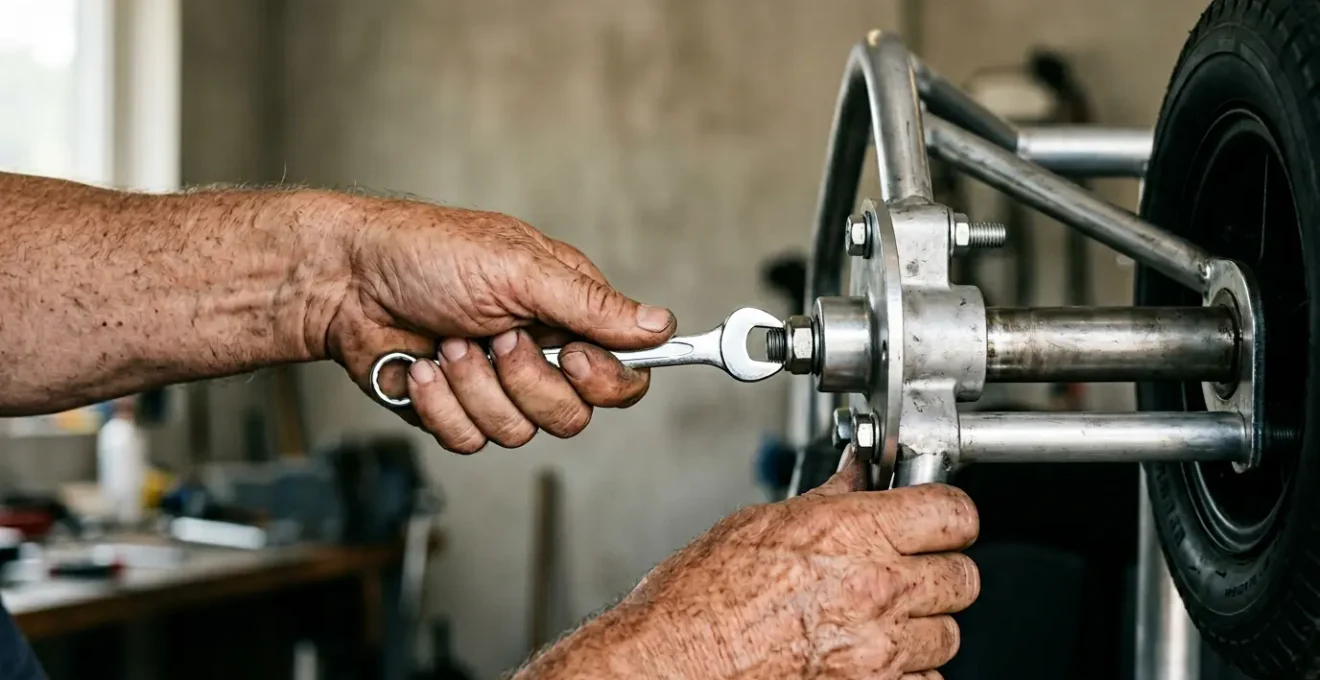
The Vibration Effect: Checking Wheel Nuts and Tiller Bolts Monthly
Every time you ride your scooter, its frame is subjected to constant, low-level vibration from the terrain. This is the « vibration effect, » and it’s the unseen enemy of mechanical integrity. Over weeks and months, these micro-vibrations can work their magic on fasteners, causing critical bolts and nuts—like those holding your wheels, seat, and tiller—to slowly but surely loosen. A loose tiller bolt can lead to unresponsive steering, and a loose wheel nut is a major safety hazard.
This is why a monthly hardware check is non-negotiable. It’s a simple, five-minute task that prevents the vast majority of mechanical failures. You don’t need to be a bodybuilder; the goal isn’t to overtighten. It’s to simply check that the bolts are still snug. Using the correct spanner or Allen key, give each of the main structural bolts a gentle check for tightness. If a bolt moves with little effort, it was too loose.
Here’s a technician’s trick to make this even easier: the ‘Mechanic’s Paint Pen Trick.’ After tightening a critical nut (like a wheel nut) to the correct torque, use a bright-colored paint pen to draw a straight line from the center of the nut onto the frame or wheel hub. During your next monthly check, a quick visual inspection is all you need. If the lines are no longer aligned, the nut has loosened and needs to be re-tightened. This simple visual cue turns a physical check into an instant safety inspection.
This image perfectly illustrates the precision required. Ensuring wheel hardware is properly torqued is not just about tightness; it’s about safety and preventing the loosening caused by constant vibration. A quarterly inspection of wiring, especially around areas where debris can collect, is also a crucial part of this preventative maintenance routine.
Corrosion Prevention: Cleaning Battery Terminals with Vaseline?
The heart of your scooter is its electrical system, and the batteries are its lifeblood. One of the most common causes of a scooter suddenly losing power or failing to charge is not a dead battery, but corroded battery terminals. As lead-acid batteries charge and discharge, they can release minute amounts of acidic gas. This gas reacts with the metal terminals and the oxygen in the air, forming a powdery, insulating deposit.
White, green, or blue powdery deposits on terminals are signs of corrosion that need immediate attention.
– Mobility Frontiers, Waterproof & Clean Mobility Scooter After Rain or Snow Guide
This powder—often white, blue, or greenish—might look harmless, but it’s an excellent electrical insulator. It effectively blocks the flow of electricity between the battery and the scooter, leading to poor performance, charging issues, or a complete power failure. The fix is simple and something you can absolutely do yourself. The key is using household chemistry to your advantage. A paste made of baking soda and a few drops of water is a mild base that safely neutralizes the acidic corrosion without damaging surrounding components.
After cleaning and thoroughly drying the terminals, the « Vaseline » trick comes into play. Applying a thin layer of petroleum jelly or dielectric grease to the clean terminals creates an airtight and moisture-proof barrier. This seal prevents oxygen and acidic vapors from reaching the metal, stopping corrosion before it can even start. This single preventative step can save you from being stranded with a scooter that seems dead but just has a bad connection.
Your Action Plan: Safe Battery Terminal Cleaning Protocol
- Disconnect the battery before any cleaning to prevent short-circuiting.
- Create a thick paste using baking soda and a few drops of water (not liquid) to prevent runoff into electronics.
- Gently clean terminals with the paste using an old toothbrush to neutralize acid corrosion.
- Dry the area thoroughly after cleaning, then apply a thin layer of petroleum jelly or dielectric grease to battery terminals to prevent future corrosion.
Blown Fuse Diagnosis: How to Find and Fix the Silent Killer?
A blown fuse is the silent killer of a mobility scooter’s operation. One moment everything is working, the next, it’s completely dead. There’s no warning, no sound—just a frustrating lack of power. But this isn’t a disaster; it’s your scooter’s safety system working perfectly. A fuse is a deliberate weak link in the electrical circuit, designed to be a sacrificial part. It contains a small wire that melts and breaks the circuit if too much current flows through, protecting your expensive motor and controller from a damaging electrical surge.
Finding the fuse is the first step in your diagnosis. Fortunately, the fuse on mobility scooters is typically found in one of three common locations: in a small, sealed holder near the battery pack, on the battery box itself, or near the main charging port. Once located, you can perform a simple visual check. A good fuse has a visible, intact wire running through its center. A blown fuse will have a broken or melted wire, often with a dark, burnt smudge inside the glass.
Replacing it is straightforward, but one rule is absolute: always replace a blown fuse with one of the exact same amperage rating. This rating (e.g., 10A, 20A) is printed on the fuse’s metal cap. Using a higher-rated fuse is like disabling your scooter’s safety net; it removes the protection and can lead to catastrophic failure of your electronics. A fuse blowing is a symptom. If a replacement fuse blows immediately, stop. This is your scooter’s « red line » signal that there is a deeper electrical short that requires a professional technician.
Your Action Plan: Step-by-Step Fuse Diagnosis and Replacement Guide
- Power off your scooter and remove the battery to ensure safety during inspection.
- Locate the fuse near the battery compartment or charging port, and extract it using a fuse puller or needle-nose pliers.
- Perform a visual check for a melted or broken wire inside the fuse glass; if unclear, test with a multimeter for continuity (a beep indicates the fuse is good).
- Replace with a fuse of the exact same amperage rating (typically 5A-30A depending on model) to prevent electrical system damage.
- If the replacement fuse blows immediately or frequently, stop and consult a professional as this indicates a deeper electrical fault.
Carbon Brushes: The Consumable Part No One Tells You About
Inside your scooter’s electric motor is a critical, yet often overlooked, « hidden consumable »: the carbon brushes. These are small blocks of graphite held by springs against a rotating part of the motor called the commutator. Their job is simple but vital: to conduct electricity from the stationary wiring to the spinning components of the motor. Because they are in constant physical contact and under friction, they are designed to wear down over time, just like the brake pads on a car.
When brushes wear down, the symptoms can be confusing. You might experience intermittent power loss, a general feeling of sluggishness, or a motor that hesitates before engaging. You might also notice a distinct ozone-like smell after a long ride or even see small sparks through the motor’s ventilation slots. These aren’t signs of a dying motor; they are classic signs of worn carbon brushes making poor contact. For many models, a technician’s analysis suggests that carbon brushes may need replacement every one to two years of regular use.

Some scooter motors have small, round plastic caps on the outside, known as inspection caps. If your motor has these, you may be able to replace the brushes yourself. It’s a task that requires care but is within the scope of an advanced DIY-er. However, this task comes with a critical « red line. » When you remove the old brush, inspect the copper commutator it was touching. If the commutator surface is smooth and coppery, you’re good to go. But if it is heavily grooved, scored, or has black burn marks, stop immediately. This indicates a problem that goes beyond simple brush replacement and requires professional servicing to avoid permanent motor damage.
The ‘Every Ride’ Rule: Why You Should Charge Even After a Short Trip?
Of all the advice a technician can give, this is the most important for the health and longevity of your batteries: charge your scooter after every single use, no matter how short the trip was. This might seem counterintuitive, like charging a phone that’s still at 80%, but the chemistry of the lead-acid batteries used in most mobility scooters makes this rule absolute. Failing to follow it is the single biggest cause of premature battery failure.
Over 90% of mobility scooter repair tasks are solved by simply replacing dead batteries caused by poor charging habits.
– Mobility Scooters Direct Technician, Mobility Scooter Maintenance Tips from the Experts
Here’s the science made simple: lead-acid batteries hate being left in a partially discharged state. When they are not fully charged, a chemical process called sulfation begins. Tiny, hard sulfate crystals start to form on the lead plates inside the battery. If the battery is recharged quickly, these crystals dissolve. But if the battery is left for days in a partially charged state, these crystals grow and harden, permanently reducing the battery’s ability to hold a charge. This is a one-way street; once significant sulfation occurs, the battery’s capacity is lost forever.
Think of it like this: leaving your batteries partially discharged is like leaving wet clothes in a pile—they’ll get musty and ruined. Charging them after every ride, even a 10-minute trip to the mailbox, is like hanging those clothes up to dry immediately. It keeps them fresh and ready for their next use. Modern « smart » chargers are designed for this; they will automatically switch to a maintenance or « float » mode once the battery is full, so there’s no risk of overcharging. Adopting the « Every Ride Rule » is the cheapest, easiest, and most effective maintenance you can perform to maximize battery life.
Allen Keys and Spanners: The 5 Tools That Fit 90% of Scooter Bolts
The idea of a « mechanic’s toolkit » can be intimidating, conjuring images of massive, expensive chests filled with hundreds of specialized tools. The reality of mobility scooter maintenance is far simpler. A huge majority of the fasteners on your scooter—from the bolts holding the shroud and tiller to the hardware on the seat and wheels—are a few standard metric sizes. You don’t need a giant kit; you need a few key tools of good quality.
A certified technician’s travel kit for roadside repairs is surprisingly minimal. It’s built around the « 90% rule, » focusing on the tools that handle 90% of the problems. For a mobility scooter, this core kit consists of just a handful of items: a 5mm Allen key, a 10mm spanner, and a 13mm spanner. These three tools will fit the vast majority of bolts on most scooter models. Adding an adjustable crescent wrench provides a backup for any odd-sized nuts, and T-handle Allen keys can be a great upgrade for users who need a better grip and more torque.
The most important part of this advice is « good quality. » Cheap tools are made from soft metal that can deform under pressure. This can round off the edges of a bolt head or nut, turning a simple tightening job into a nightmare that requires professional extraction tools. As a technician warns:
Soft metal on cheap tools can round off a bolt head or nut, turning a 5-minute DIY job into a $100+ professional repair requiring specialized extraction tools.
– Mobility Equipment Technician, Mobility Scooter Maintenance Guide
Investing a few extra dollars in a small set of hardened steel tools from a reputable brand is one of the smartest investments you can make. It’s the difference between a successful 5-minute fix and a costly call to a repair shop.
Key takeaways
- Regular lubrication and bolt checks prevent most mechanical issues.
- Simple electrical checks (battery terminals, fuses) can solve common « no power » problems.
- Knowing your limits and having a basic on-board kit are the keys to safe DIY maintenance.
Building the Ultimate On-Board Maintenance Kit for Scooter Breakdowns
Performing maintenance in the comfort of your garage is one thing; facing a breakdown a mile from home is another. The ultimate goal of DIY knowledge is self-reliance, and that extends to being prepared on the go. An on-board maintenance kit isn’t about being able to rebuild your motor on the sidewalk. It’s about having the essential, low-tech items to handle minor emergencies and get you moving again safely.
Your on-board kit should be built around the tools we’ve already identified—the core Allen keys and spanners. But it should also include several « get out of jail free » items. A few heavy-duty zip ties can temporarily re-secure a loose bumper or dangling cable. A small roll of electrical tape can insulate a frayed wire to prevent a short circuit. A pair of nitrile gloves and a rag mean you can handle a greasy part without getting grime everywhere.
One of the most overlooked but crucial tools is light. Trying to find a dropped bolt or inspect a fuse in twilight is nearly impossible. A small, bright LED headlamp is an invaluable addition to any kit, keeping your hands free to work. It allows you to see into the dark corners of the chassis and can also make you more visible to others if you’re stuck on a path after dusk.
However, the single most important item in your on-board safety kit isn’t a tool at all: it’s a fully charged phone and a portable power bank. This is your ultimate safety net. Your DIY skills are there to handle the simple problems, but you must have the wisdom to recognize when a problem is beyond your scope. Being able to confidently call for assistance when you’ve hit your « red line » is the mark of a truly smart and safe scooter owner.
Armed with this knowledge, you are now equipped to confidently handle the most common maintenance tasks. Start today by performing a simple bolt check; your scooter’s reliability begins with you.